
Common workflows and support questions for core users are addressed below. Core users are defined as those who are a member or administrator of a shared resource which provides services and/or equipment for use by lab users.
Are you a group/lab user? Visit our Group User Support page!
If you have additional questions, please visit the iLab help page (link will take you iLab’s site), fill out our contact form, or e-mail “Support@ilab.wisc.edu“.
Getting Started
This is an accordion element with a series of buttons that open and close related content panels.
How do I access iLab?
Existing users log into iLab at https://uwmadison.ilab.agilent.com/account/login
New PIs and new group/lab members should follow the instructions in the applicable “Registering an account” tab(s) below.
Core level administrative roles
Core administrator
- Full access to core’s site and members
- Manage all administrative settings
- Access to all editing functions
- Run billing and reporting
Core financial manager
- Edit content on the “About our Core” page, “Request Services” and “Schedule Equipment” tabs
- Manage requests and calendars
- Manage facility members
- Run billing and reporting capabilities
Core manager
- Edit content on the “About our Core” page, “Request Services” and “Schedule Equipment” tabs
- Manage requests and calendars
- Run billing and reporting capabilities
Core member
- Initiate reservations/project requests on behalf of users
- Manage requests and calendars
Registering an account as a UW principle investigator
REGISTERING FOR AN ACCOUNT
- Navigate to the iLab login page and click the ‘Register’ button in the top right of the screen then click the ‘Registering using UW credentials’ link.
- Log in with your NetID and password.
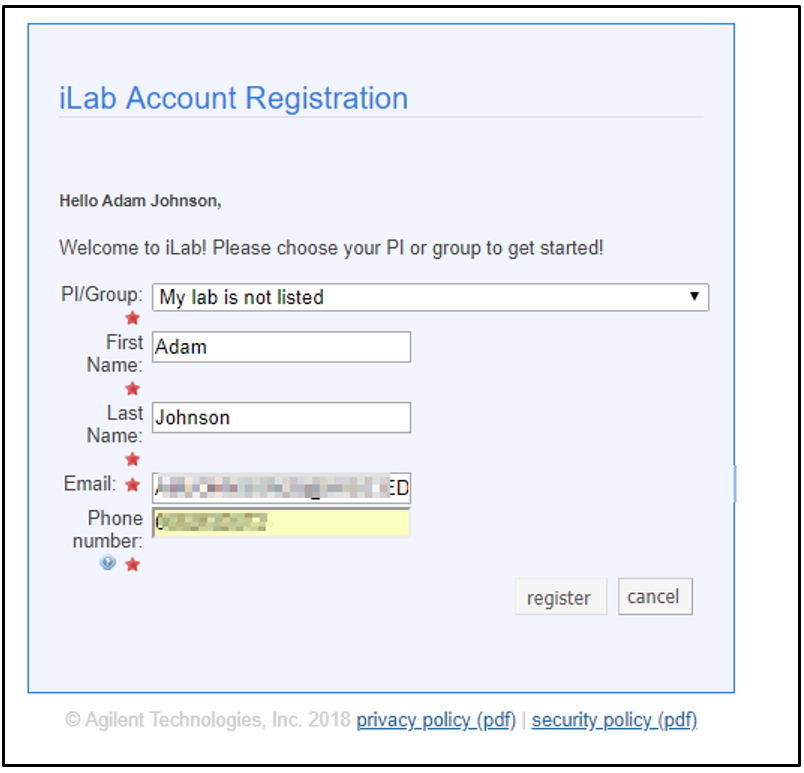
- Search the ‘PI/Group’ dropdown for your name. If your name is not there, select the ‘My lab is not listed’ option. Fill in your contact phone number. Click the ‘register’ button.
- Once your request has been submitted, the iLab team will work with you to get your group/lab created. When this is complete, you will be able to access iLab.
- Ensure that your time zone is set to Central Standard Time
- Before you are able to request services and schedule equipment with UWCCC Cores, the following steps must be complete for your lab:
ADDING YOUR GROUP/LAB MEMBERS
If your group/lab members are already registered to another group within iLab, you may add them to your group:
- In your group/lab, click the “Members” tab
- At the bottom of the page, click “Link existing user”
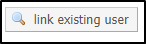
- Enter a name to search, click on the correct name in the results, and click “Add”
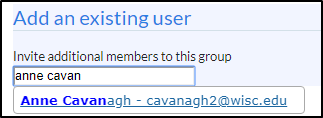
- The group/lab member will be able to select the group when ordering services or reserving resources using iLab
Most group/lab members will need to request access to your group. Once they’ve requested access, complete the following steps:
- Log into iLab and select “My Groups” on the left navigation bar
- Select the name of the group/lab to which you want to add lab members
- Select the “Membership Requests & UW fundings” tab. New membership requests will show at the top of this page
- Click “Approve” to accept a member into your lab. Click “Reject” if they are not a member of your group/lab.
ADDING FUNDING ACCOUNTS (FUNDING STRINGS)
- Log into iLab and select “My Groups” on the left navigation bar
- Select the name of the group/lab to which you want to add funding account
- On the lab page, open the “Membership Requests & UW fundings” tab
- Scroll to the bottom and select “Manually add a new UW funding”
- Fill out the required information and select “Add”
- The funding account will now be available in the Manage UW fundings table.
- Select the corresponding staff check boxes in the column for the funding account to give them access to that funding string. Group/lab members will now be able to use that funding string to request services or make appointments
OPTIONAL: DESIGNATE A LAB MANAGER/PROXY
- Log into iLab and select “My Groups” on the left navigation bar
- Select the name of the group/lab for which you want to designate a manager
- On the lab page, open the “Members” tab
- Find the member you want to designate as a manager and select the yellow pencil icon to the right of their name
- In the “Lvl:” dropdown, change their level to “Manager”
- If the member you have designated as a manager should also receive invoices for core services, select the “Core Financial Contact” checkbox.
- Select “Save” to the right of the member’s name.
Registering an account as an external principle investigator
REGISTERING FOR AN ACCOUNT
- Request access to UW—Madison’s service centers: https://uwmadison.ilabsolutions.com/account/signup/1802
ADDING YOUR LAB MEMBERS
If your group/lab members are already registered to another group within iLab, you may add them to using the following workflow:
- In your group/lab, click the “Members” tab
- At the bottom of the page, click “Link existing user”
- Enter a name to search, click on the correct name in the results, and click “Add”
- The member will be able to select the group/lab name when ordering services or reserving resources using iLab
Most members will need to request access to your group. Once they’ve requested access, complete the following steps:
- Log into iLab and select “My Groups” on the left navigation bar
- Select the name of the group/lab to which you want to add members
- Select the “Membership Requests & UW fundings” tab. New membership requests will show at the top of this page
- Click “Approve” to accept a member into your group/lab. Click “Reject” if they are not a member of your group.
OPTIONAL: DESIGNATE A GROUP MANAGER/PROXY
- Log into iLab and select “My Groups” on the left navigation bar
- Select the name of the group/lab for which you want to designate a manager
- On the group/lab page, open the “Members” tab
- Find the member you want to designate as a manager and select the yellow pencil icon to the right of their name
- In the “Lvl:” dropdown, change their level to “Manager”
- If the member you have designated as a manager should also receive invoices for core services, select the “Financial Contact” checkbox.
- Select “Save” to the right of the member’s name.
Managing a core
Core Administrators and their staff are responsible for managing all aspects of a core. This includes maintaining the services and resources offered, managing requests and reservations, completing billing events, running reports and managing settings as needed.
To learn more about accessing and navigating your core, visit the “Overview of Managing a Core” page on the iLab help site.
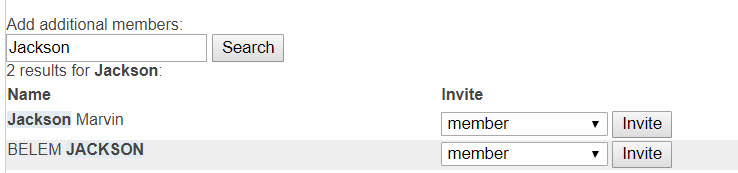
Add new members to your core
The Members Panel is a list of all core or administration staff who have access to manage your core. The Members panel is accessed through the Administration tab. From the Members Panel, you may add new members to your core, view and edit the role of existing members, edit member profile details, or delete current members.
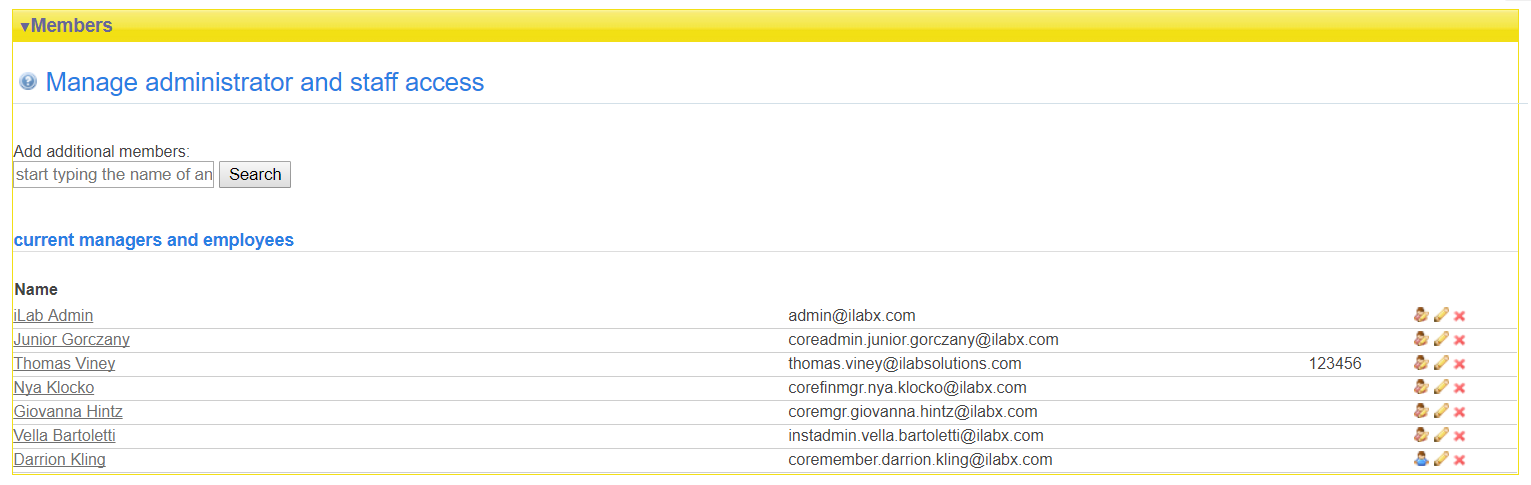
To add an additional member to your core, type their name into the search box. When the correct person displays, select the role you wish to assign to them, and click the “Invite” button. Helpful Hint: If two people have the same name, you can hover over the name to see the email associated with each individual.
To delete a member, click the red X beside the name you wish to remove.
Advanced workflows
This is an accordion element with a series of buttons that open and close related content panels.
Scheduling out equipment
The Schedule Equipment tab within iLab is used by core administrators to handle reservations, confirm usage, edit calendar settings for equipment and more. Visit the “Overview of Schedule Equipment” page for help on:
- Confirming usage
- Messaging customers
- Creating permission groups
- Viewing schedules
- Reviewing and uploading usage
- Usage capping
- Schedule settings
Managing requests
To manage your core’s requests, visit iLab’s View All Requests help page. Here you will learn to:
- Message customers
- Use Filters
- Manage a single service request
- Learn about Request statuses
- Change fund/payment information
- Add comments
- Use milestones
Billing
For billing assistance, please visit iLab’s Billing help page. Here you will learn to:
- View charges
- Create a new billing event
- Handle billing errors
- Manage invoices
- Detach invoices
- Handle disputes and refunds
Still have questions?
Submit a help ticket, or e-mail support@ilab.wisc.edu for further assistance.